Your bundle discounts are great—but are your customers seeing just how great they are? If your crossed-out prices only reflect your current selling price, you might be leaving perceived value on the table. With our new "Use compare-at-price for crossed-out price" feature, your bundles can now reference Shopify's compare-at price (MSRP) as the strikethrough price, making your bundle deals look even more compelling.
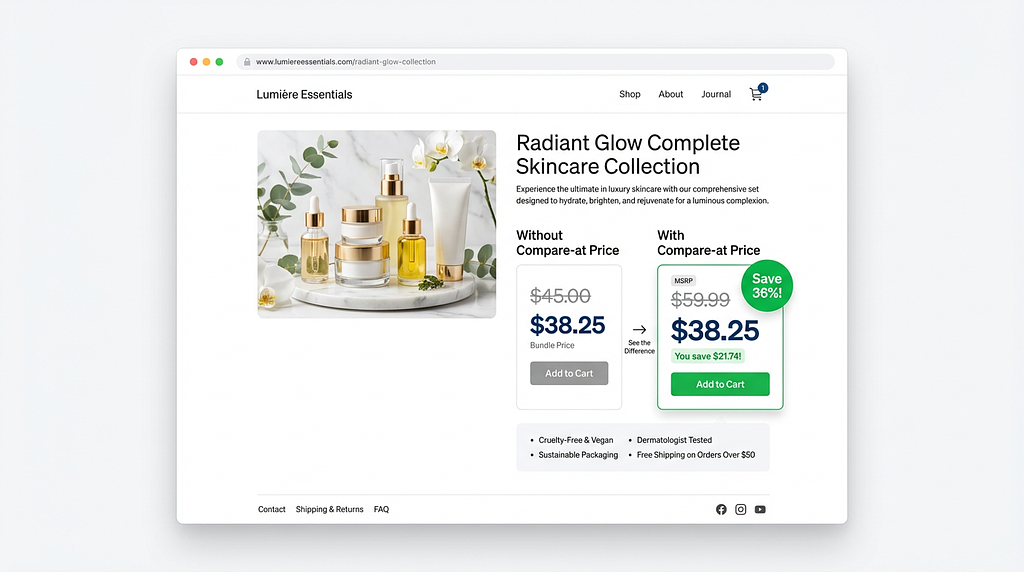
Compare-at price comparison
What is the Compare-at Price?
In Shopify, every product can have two prices:
Price — the current selling price your customer pays
Compare-at price — the original or MSRP price, often shown as a strikethrough to indicate a sale
Many merchants already use compare-at pricing on their product pages to show customers that a product is discounted from its original retail price. But until now, bundle apps would only use the active selling price as the crossed-out reference point—missing the opportunity to show the full extent of the deal.
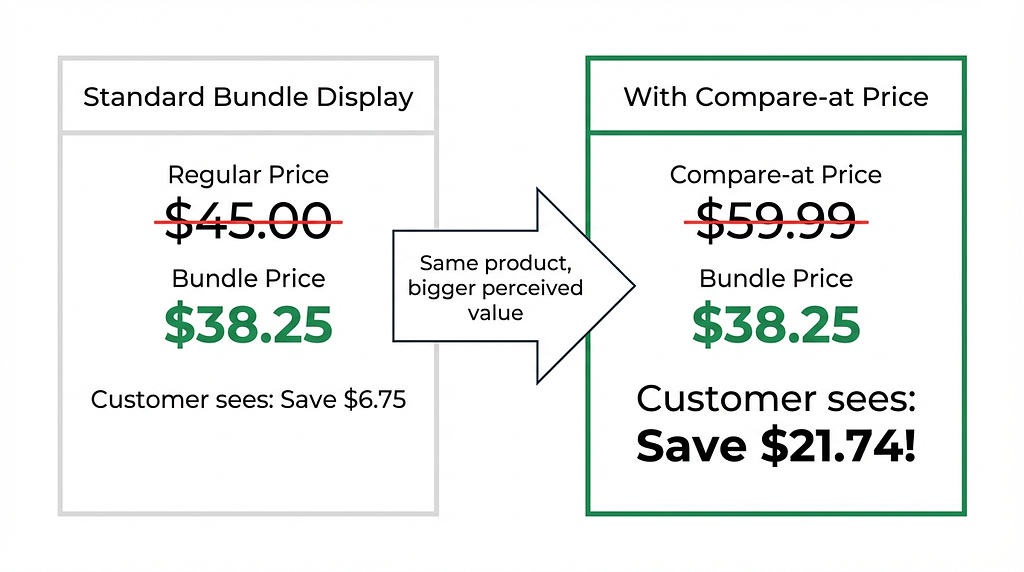
The Problem: Small Perceived Savings
Let's say you sell a product with:
Compare-at price (MSRP): $59.99
Current selling price: $45.00
Bundle discount: 15% off
Without compare-at price enabled, your bundle shows:
$45.00 → $38.25 Customer perceives: "I save $6.75"
With compare-at price enabled, your bundle shows:
$59.99 → $38.25 Customer perceives: "I save $21.74!"
Same product. Same bundle price. But a 3x bigger perceived discount.
Perceived savings
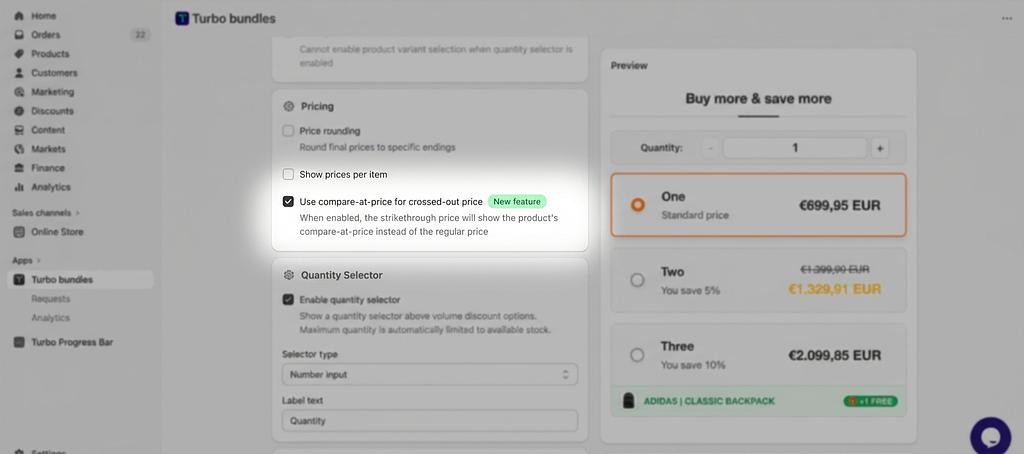
How to Enable It
We've made this incredibly simple—just one checkbox:
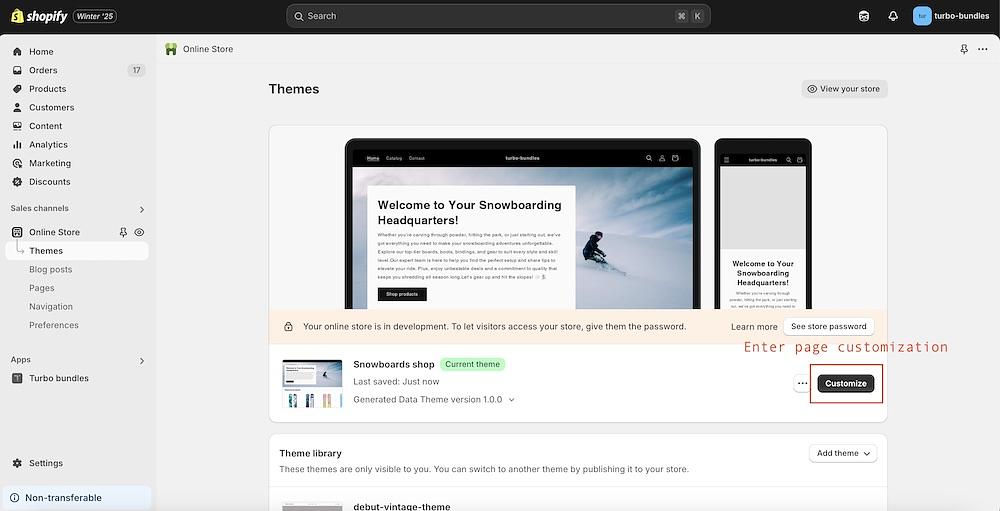
Open the Turbo Bundles app in your Shopify Admin
Create a new campaign or edit an existing one
Scroll to the Discount & Pricing section
Check the box labeled "Use compare-at-price for crossed-out price"
Save and publish your campaign
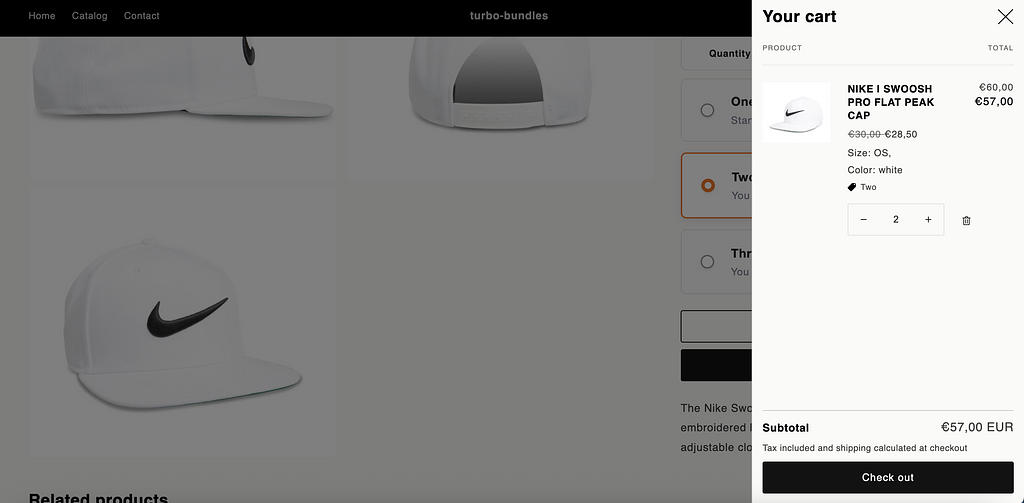
That's it. The feature works across all three bundle types:
Volume Discounts — "Buy 2, get 15% off" with MSRP as the strikethrough
Mix & Match — combo bundles with individual item compare-at prices
Frequently Bought Together — upsell bundles showing the full perceived savings
Bundle configuration
Smart Behavior: Works Even Without a Discount
Here's a detail merchants love: if your bundle has no additional discount applied (discount type set to "No discount"), but the product's compare-at price is higher than its selling price, the bundle will still show a visual discount. The compare-at price appears as the strikethrough, and the regular selling price appears as the "deal" price.
This is perfect for merchants who want to highlight existing product-level sales within their bundle UI without stacking additional discounts.
Why This Matters for Conversions
Pricing psychology research consistently shows that anchor pricing—showing a higher reference price next to a lower actual price—significantly increases purchase intent. By anchoring your bundle price against the compare-at price (MSRP), you:
Increase perceived value — customers feel they're getting a bigger deal
Reduce purchase hesitation — the savings are immediately obvious
Stay honest — you're using Shopify's native compare-at price, not inflated numbers
Real-World Use Cases
Fashion & Apparel
Seasonal markdowns are common. Your product might already be on sale from $80 to $55. With compare-at pricing enabled in your bundle, a "Buy 2 for 10% off" deal shows $80 → $49.50 instead of $55 → $49.50. The customer sees a 38% savings from MSRP rather than a modest 10%.
Health & Beauty
Products with manufacturer's suggested retail prices (MSRP) benefit enormously. A skincare bundle that shows savings from the MSRP communicates premium value while still offering an attractive deal.
Electronics & Accessories
Tech products often have list prices that differ from street prices. Show customers how much they're saving compared to the manufacturer's price when buying accessories together.
Frequently Asked Questions
What happens if a product doesn't have a compare-at price set?
No problem. The feature gracefully falls back to the regular selling price for that product. If you have a mix of products—some with compare-at prices and some without—each product will show the best available reference price.
Does this work with variant-specific pricing?
Yes! When a customer selects a different variant on the product page, the bundle prices update instantly to reflect that variant's compare-at price and selling price. No page refresh required.
Will this affect the actual discount my customers receive?
No. This feature only changes what's displayed as the crossed-out price. The actual bundle discount calculation and the price customers pay remain exactly the same.
Does it work with Shopify's EU compare-at price regulations?
Yes. If you have Shopify's "Hide compare-at prices for European Economic Area (EEA) customers" setting enabled, those regulations will still be respected. For more details, see our guide on why compare-at prices might not show for your bundles.
Get Started Today
The compare-at price feature is available right now for all Turbo Bundles merchants—no plan upgrade required. Just enable the checkbox and watch your bundle deals become more compelling.
Install Turbo Bundles if you haven't already, or open the app in your Shopify Admin to enable this feature on your existing campaigns.
Have questions about setting up compare-at pricing for your bundles? Reach out to our support team—we're happy to help!
In the world of e-commerce, success isn't just about total sales—it's about understanding the incremental value your bundles create. For merchants using product bundling strategies, additional revenue measures the true business impact of your bundle discounts.
At Turbo Bundles, we've built our entire pricing model around this concept: merchants only pay based on the additional revenue their bundles generate. But what exactly is additional revenue, and why should you care? Let's break down this essential metric.
What is Additional Revenue?
Additional revenue measures the incremental value created by your bundle discounts. It's the extra revenue generated from products that customers buy because of your bundle offers.
The Simple Explanation
Example: One product costs $30.00 individually
- You offer a bundle of 2 products for $50.00
- Normally 2 products would cost $60.00
- Additional revenue = $20.00
Why this matters: The bundle discount of $10 incentivized the customer to buy the second $30 product. The additional revenue represents the value of that second product that was driven by your bundling strategy.
Upselling bundled item
Why This Matters More Than Total Revenue
Total revenue tells you what customers spent. Additional revenue tells you what bundling added to your business.
Additional revenue shows the true incremental value your bundle strategy creates, not just the revenue it captures. - Turbo Bundles Team
Dashboard analytics screen
Key Principle: Additional Revenue = Value of Items Driven by Bundle Discount
Your bundle discount creates incremental value:
- Customer pays $50 for 2 items they receive
- They would have paid $30 for 1 item they wanted
- Additional revenue = $20 (the incremental value your bundle created)
Why this works: Additional revenue measures the extra value your bundling strategy generates beyond what customers would have purchased without the bundle discount.
Why Additional Revenue is the Most Important Metric for Bundle Success
1. True ROI Measurement
Traditional metrics can be misleading:
- Conversion Rate: Shows traffic → sales, but not incremental value
- Average Order Value: Includes all products, not just bundle impact
- Bundle Revenue: Only shows what bundles generated, not what they *added*
Additional revenue answers: "How much discount am I providing to drive incremental sales?"
The key insight: Additional revenue measures the incremental value your bundle discount creates. A $10 discount might generate $20 in additional revenue if it drives the purchase of an extra $30 item.
2. Optimizes Your Bundle Strategy
By understanding which bundles create the most additional revenue, you can:
- Prioritize High-Impact Bundles: Focus on bundles that genuinely increase purchase volume beyond what volume discounts alone would achieve
- Eliminate Low-Value Bundles: Stop bundles that just match existing volume discount pricing without creating incremental value
- A/B Test Effectively: Compare bundles based on real incremental value, not just sales volume or discount percentage
3. Informed Pricing Decisions
Additional revenue data helps you:
- Set Optimal Bundle Prices: Balance attractiveness with profitability, knowing the true incremental value
- Calculate True Margins: Understand the real profit impact by accounting for existing discount structures
- Justify Marketing Spend: Prove the ROI of bundle-focused advertising by showing revenue that wouldn't exist otherwise
How Merchants Use Additional Revenue for Success:
Strategy 1: Bundle Value Optimization
Case Study: Fashion Retailer
- Before: All bundles offered 20% discount regardless of product combination
- Analysis: Additional revenue showed that premium product bundles ($200 value) generated 3x more additional revenue than basic accessory bundles ($50 value)
- Result: Focused on high-value bundles, increased overall additional revenue by 60%
Action Steps:
1. Calculate additional revenue potential for different product combinations
2. Prioritize bundles with high individual item values that customers want
3. Test discount levels to maximize incremental purchases, not just discount percentage
4. Focus on bundles that drive purchase of items with highest individual value
Strategy 2: High-Value Product Bundling
Case Study: Electronics Retailer
- Challenge: Premium products had high margins but low conversion
- Solution: Created bundles with premium products at 25% discount, tracked additional revenue
1. Identify high-margin products with low individual conversion
2. Calculate optimal discount levels that maintain healthy margins
3. Create bundles that make premium products more accessible
4. Monitor additional revenue to ensure profitability
Strategy 3: Inventory Clearance Strategy
Case Study: Fashion Retailer
- Problem: Seasonal inventory needed to be cleared
- Solution: Bundled overstock items with popular products at 30% discount
- Result: Cleared $50K in inventory while generating $15K additional revenue
Action Steps:
1. Identify products with excess inventory
2. Calculate discount needed to move inventory within timeframe
3. Bundle with complementary fast-moving products
4. Track additional revenue vs inventory carrying costs
The Future of Bundle Analytics
As e-commerce evolves, additional revenue tracking will become standard practice. Here's what's coming:
Advanced Attribution Models
- Machine Learning: AI-powered attribution considering hundreds of variables
- Real-Time Updates: Live additional revenue tracking as sales happen
- Predictive Analytics: Forecast bundle performance before launch
Integration with Broader Metrics
- Customer Lifetime Value: How bundles affect long-term customer value
- Inventory Optimization: Bundles that reduce overstock
- Marketing Attribution: How bundles contribute to overall marketing ROI
Conclusion: Make Additional Revenue Your North Star
In the competitive world of e-commerce, understanding the true cost and value of your bundle discounts is crucial. Additional revenue measures exactly what you're investing in your bundling strategy—and what you're getting back.
Start optimizing your additional revenue today:
1. Calculate additional revenue for your current bundles using the formula above
2. Identify bundles that drive purchase of your highest-value items
3. Test different product combinations to maximize incremental value
4. Focus on bundles that generate the highest additional revenue per discount dollar
Remember: Additional revenue measures the true incremental value your bundles create. A great bundle doesn't just offer a discount—it drives customers to buy more than they otherwise would.
---
Ready to unlock the power of additional revenue tracking? Start your free trial of Turbo Bundles and see how much incremental revenue your bundles are actually creating.
Have questions about additional revenue or bundle strategy? Contact our team for personalized advice.
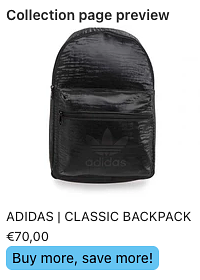
We’re excited to announce a brand-new feature inside Turbo Bundles that helps Shopify merchants increase sales and grab shopper attention: Sale Badges.
Buy more, save more!
Why Sale Badges Matter
Shoppers respond quickly to visual cues. A small tag like “On Sale”, “Limited Offer”, or “Save 20%” can make the difference between a casual browser and a paying customer. Research shows that clear product badges:
* Increase click-through rates
* Highlight promotions instantly
* Drive urgency and trust
With Turbo Bundles’ Sale Badges, you can now automatically showcase discounts and bundle promotions across your store.
How Turbo Bundles’ Sale Badges Work
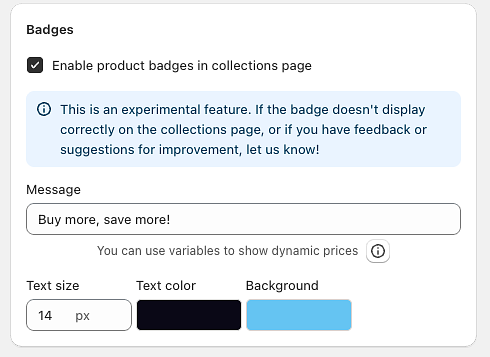
The feature is designed to be easy, customizable, and conversion-focused:
* Automatic badges: Applied to any bundle or discounted product you create.
* Customizable styles: Choose colors, text, and placement to match your theme.
* Seamless integration: Works with all existing Turbo Bundles promotions.
* More trust: Professional badges signal legitimacy and urgency.
Badge Variables for Dynamic Content Make your badges even more compelling with dynamic variables that automatically display pricing information:
{lowest_deal_price} - Shows the lowest discounted price from all your bundle deals
Example: "Starting from {lowest_deal_price}" displays as "Starting from $19.99"
{max_discount_percent} - Displays the highest percentage discount available
Example: "Save up to {max_discount_percent}" displays as "Save up to 35% off"
{max_discount_amount} - Shows the maximum discount amount in dollars
Example: "Save {max_discount_amount} on bundles" displays as "Save $15.00 on bundles"
These variables automatically update based on your current bundle deals, ensuring your badges always show accurate pricing information without manual updates.
How to Get Started
While creating campaign, just make sure this checkbox is enabled. Customize your badge design and text and you are good to go!
Badge example
That’s it—your Shopify store now has eye-catching promotions running automatically.
Final Thoughts
Turbo Bundles has always been about helping Shopify merchants maximize sales through smarter bundling and promotions. With Sale Badges, we’re taking that mission further by giving you a simple tool to highlight offers and boost conversions instantly.
What if your store could style itself? Our new AI-powered design feature turns your ideas—and even your images—into ready-to-apply, on-brand themes with one click. Describe a vibe like “Scandinavian minimalism with warm neutrals,” upload a reference image if you have one, and you’ll get three curated theme options to preview instantly.
Demo in shopify admin
Why this matters for merchants - Speed to beautiful: Go from blank canvas to polished design in seconds, not days. - On-brand, not generic: Use a photo of your packaging, a holiday visual, or a moodboard to guide the AI’s choices. - Experiment safely: Preview multiple options and switch back at any time—no irreversible changes. - Seasonal agility: Create variants for Halloween, BFCM, and Christmas without redoing your whole theme. - Data-driven design: Spin up A/B variants quickly; test hero color, accents, and typography for conversion. - Consistency at scale: Ensure palettes and spacing stay coherent across pages and campaigns. - Great for new stores: Get a credible starting point that looks like a pro touched it.
The UI uses this to update palette, typography, spacing, and component treatments in real time.
When to use the image option - Brand anchoring: Upload your packaging, logo grid, or a product flatlay to pull the exact tones and textures. - Seasonal campaigns: Drop a holiday graphic and ask for “festive but premium; reds muted, gold accents.” - Competitor/mood inspiration: Use a moodboard or a storefront photo you admire to inspire—but not copy—the vibe.
Tips for great results - Be descriptive: “Warm, editorial, airy, generous whitespace, serif headings, cozy coffee-house palette.” - Mention use-cases: “Optimized for average order value; bold call-to-action; clear price contrasts.” - Constrain palette: “Two-color palette only; monochrome with a single accent of coral.” - Attach a strong reference: Clean, well-lit images with clear colors yield better palettes.
Trust and safety - Privacy: Images are processed for design extraction and not retained beyond what’s needed for your job. - Control: You preview before saving. You can revert or try again without risk.
What this unlocks for shop owners - Rapid campaign theming: Create a “Summer Sale” look in 30 seconds, then roll into “Back to School” without designer bottlenecks. - Localized aesthetics: Generate variants tuned to different markets’ tastes and languages; match typography to region norms. - Category-specific vibes: Make skincare pages softer and tech pages sharper from the same theme base. - A/B/n theme experiments: Test hero color warmth, styles, or type hierarchy to find what converts.
Ready-to-use image prompts (for a generator) - “A tasteful ecommerce moodboard in neutral tones with soft textures, cream and sage palette, elegant serif headings.” - “Festive storefront moodboard: deep forest green, muted red accents, gold foil texture, premium holiday packaging.” - “Playful candy-shop vibe: bold pastels, rounded buttons, bubbly typography, optimistic, high-contrast UI elements.”
Ready to give your store a fresh look? Describe your vibe, drop a reference image, and let the AI give you three beautiful, on-brand options. Preview them live, pick your favorite, and ship it today. - Try it with a product photo: See how your packaging’s exact colors turn into a theme. - No risk: Preview and revert anytime. - Endless variations: Seasonal, localized, or campaign-specific—without starting from scratch.
The "compare-at price" is a powerful tool that shows customers the savings they're getting. If you've set up a bundle deal but the original price isn't showing up with a strikethrough, it might be due to a specific setting in your Shopify market preferences, particularly for stores selling in Europe.
Shopify provides an option to hide compare-at prices for customers in the European Economic Area (EEA) to comply with local regulations. If this setting is enabled, the compare-at price will be hidden for all products, including those in your Turbo Bundles deals.
Here is how to check and disable this setting:
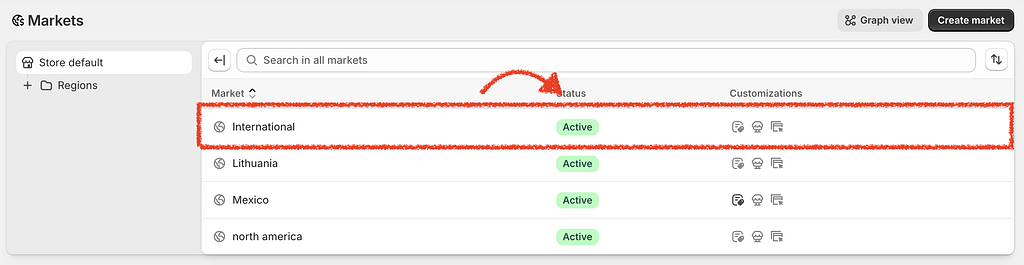
From your Shopify admin, navigate to Settings → Markets.
Markets
Click on Market
Click on a market
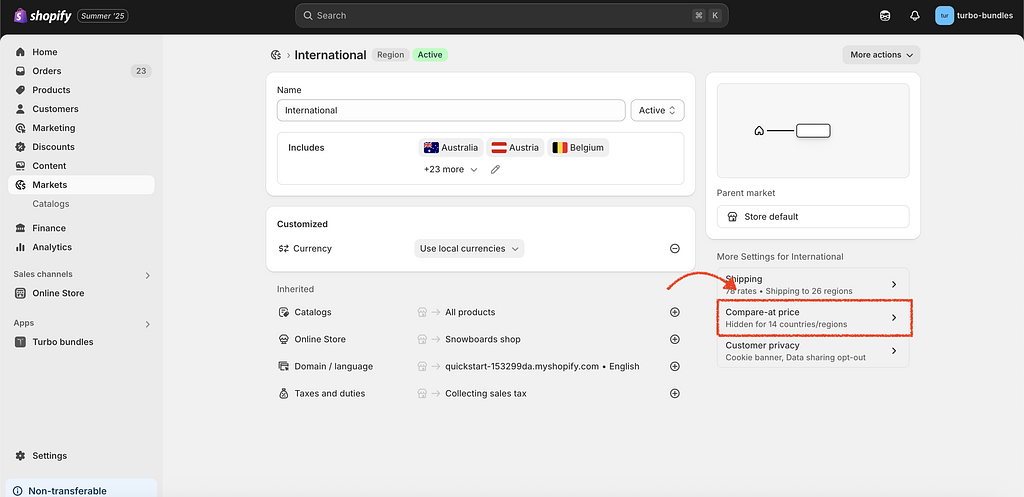
Click on Compare-at price under more settings.
Compare-at price settings
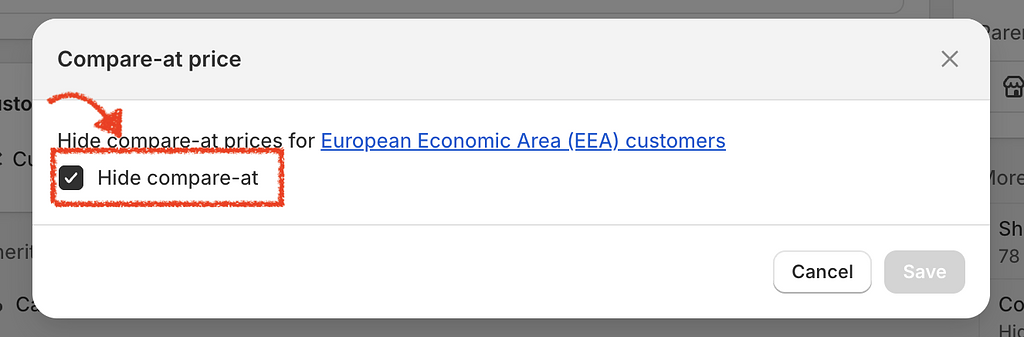
Look for the section related to EU/EEA pricing. You will see a checkbox labeled Hide compare-at prices for European Economic Area (EEA) customers.
Make sure this checkbox is unchecked.
Hide compare-at checkbox
Save your changes.
After disabling this option, the compare-at price should appear correctly on your product pages and in the Turbo Bundles widget.
We're here to help you succeed! Whether you have a question about setting up a bundle, need help with theme integration, or have a feature request, our team is ready to assist.
There are two primary ways to get in touch with us:
Live Chat (Recommended)
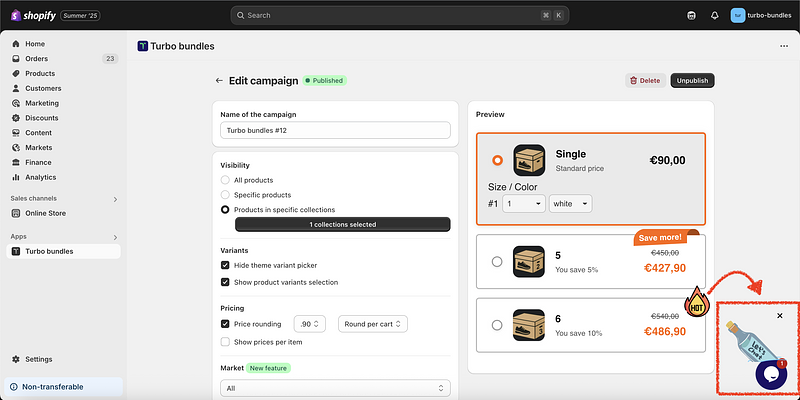
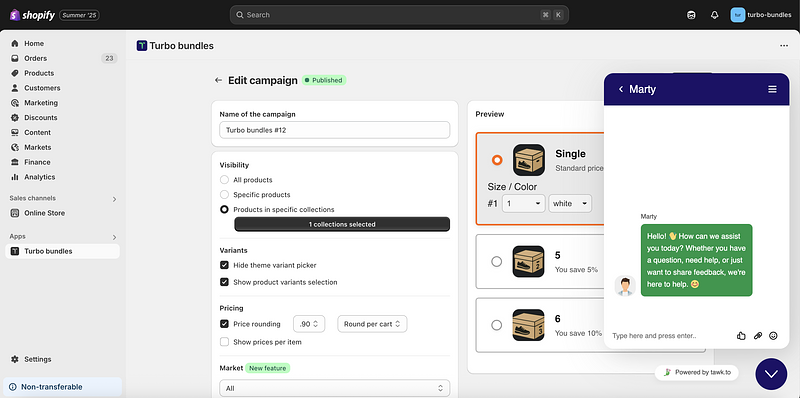
For the quickest response, you can contact us via the live chat bubble inside the Turbo Bundles app.
Open the Turbo Bundles app in your Shopify Admin.
Click on the chat icon located at the bottom right corner of the page.
Chat location in the app
Open chat
Send us a message, and one of our support agents will get back to you as soon as possible.
Using the in-app chat is the best method because it provides our team with the context of your shop, which helps us resolve your issues faster.
Email Support
If you are unable to access the app or prefer email, you can reach us at [email protected]. Please be sure to include your shop's .myshopify.com URL so we can locate your account.
Turbo Bundles is designed to integrate seamlessly with your Shopify store, which includes inheriting your store's currency formatting settings. This ensures a consistent look and feel for your customers between your product pages and our bundle offers.
If you need to change how prices are displayed—for example, to move the currency symbol, add or remove decimal places, or change the decimal separator—you can do so directly in your Shopify admin settings.
Here’s how to adjust your currency formatting:
From your Shopify Admin, go to Settings → Store details.
Store details
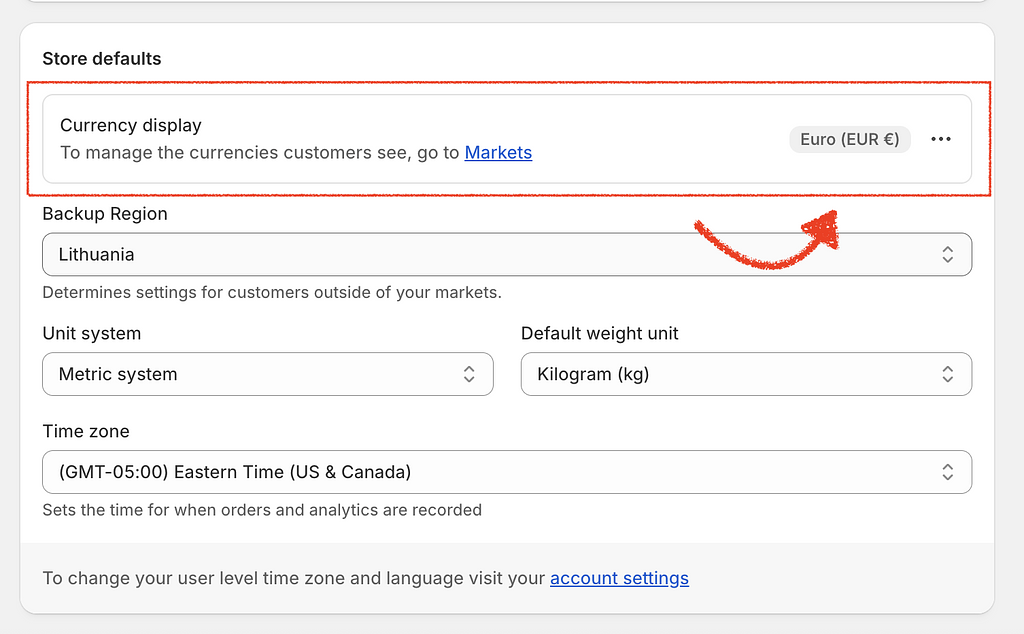
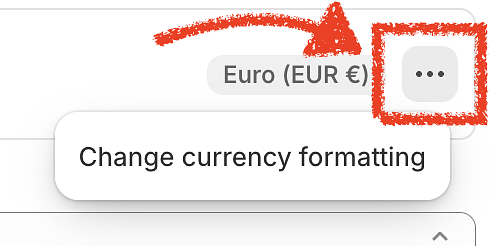
In the Store display section, click the Change formatting link.
Currency display setting
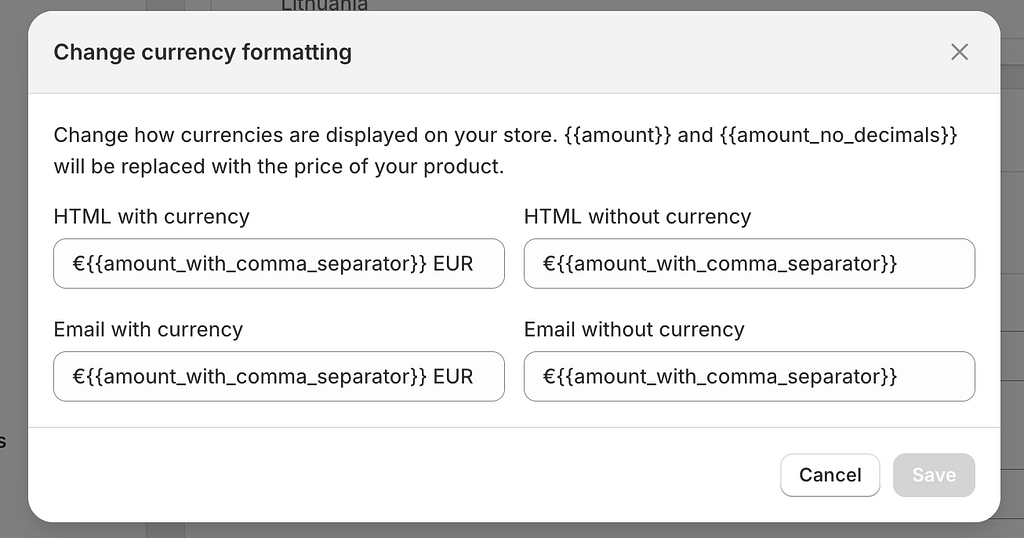
You will see four formatting options. Turbo Bundles uses the HTML with currency and HTML without currency fields to display prices.
Currency formatting
HTML with currency: Used for prices that should display the currency symbol (e.g., $10.00).
HTML without currency: Used where only the numerical value is needed.
Modify these fields according to your needs. For example, to remove decimals, you can change {{ amount }} to {{ amount_no_decimals }}.
Click Save. The changes will automatically be reflected in the Turbo Bundles widget on your storefront.
For more detailed information on all the available formatting options, please refer to Shopify's official currency formatting documentation.
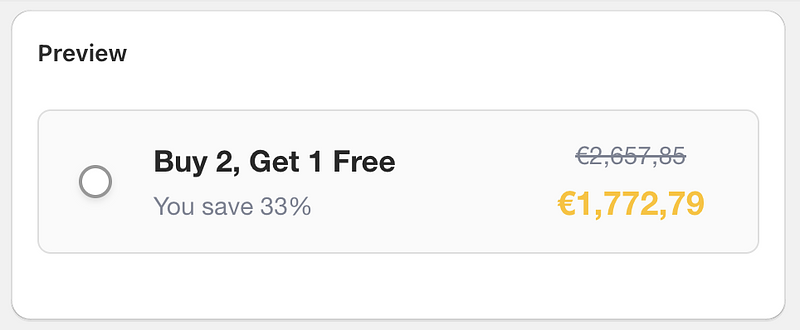
BOGO (Buy One, Get One) deals are a powerful marketing strategy to increase your average order value and clear inventory. While the name suggests getting one item free, the "Buy X, Get Y" model is flexible, and you can configure various promotions like "Buy 2, Get 1 Free" or even "Buy 1, Get 2 Free."
With Turbo Bundles, you can easily create these types of offers using product bundles and percentage-based discounts. Here’s how:
How to create a classic "Buy 1, Get 1 Free" deal
In this classic scenario, your customer buys two of the same item, but only pays for one. This is equivalent to a 50% discount on each item when two are purchased.
To set it up in Turbo Bundles:
Navigate to the Bundles section in the app and click Create bundle.
Give your bundle a title, for example, "BOGO: Buy One Get One Free!"
In the "Products" section, select the product you want to offer this deal on.
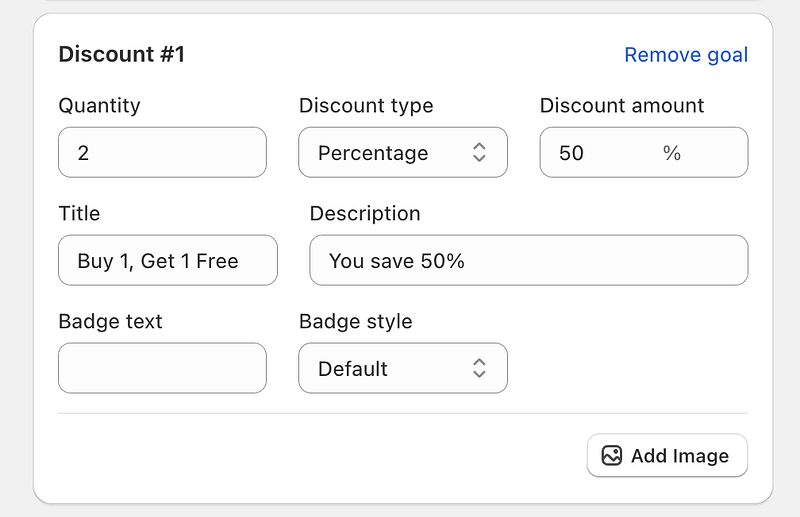
Set up your discount:
Quantity: 2 (The deal applies when 2 items are in the cart).
Discount Type: Percentage.
Discount Amount: 50%.
Discount configuration
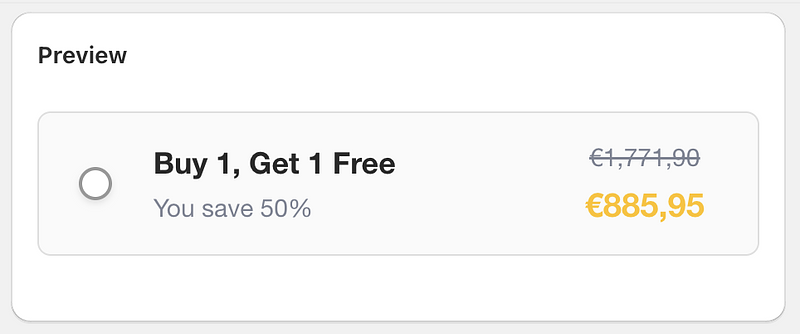
Preview
This configuration ensures that when a customer adds two of the selected items to their cart, they will receive a 50% discount on the total price of those two items, effectively making one of them free.
Advanced BOGO Deals: "Buy 2, Get 1 Free"
Let's create a "Buy 2, Get 1 Free" offer. Here, the customer gets 3 items in total, with one of them being free.
Learn how to reposition or embed the Turbo Bundles widget into your store’s page builder.
The Turbo Bundles app effortlessly adds its widget to your product pages automatically, requiring no manual setup. However, the widget snippet is flexible and can be placed or embedded in other locations within product details or product information, using app block
In This Guide:
Overview of the widget snippet
Repositioning the widget on product pages
Widget Snippet Overview
Before exploring placements, let’s understand the key elements needed for the Turbo Bundles widget to function:
Product - product is selected automatically, but widget must be placed in product information or product details section
Form - a container that triggers the "add to cart" action must be present.
Form Submit Button - The widget uses the store’s native form submit button.
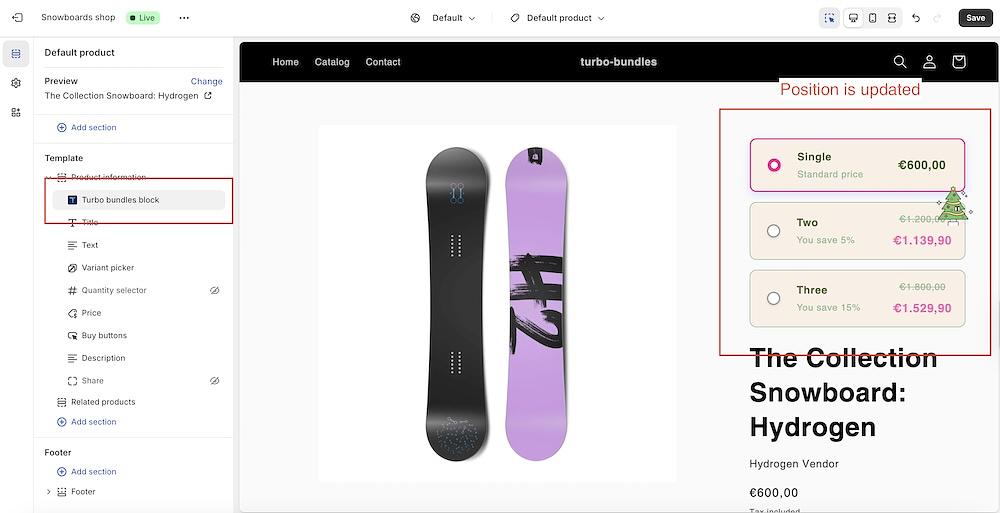
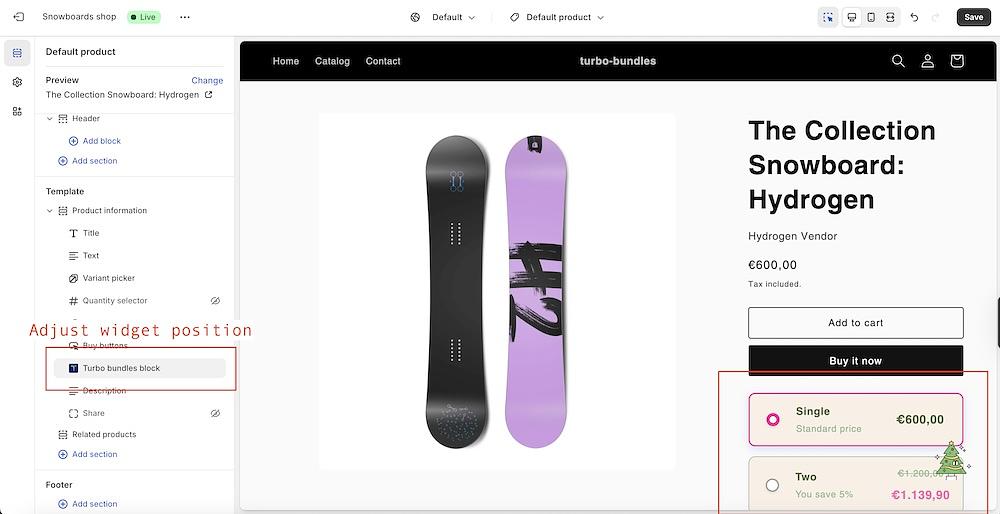
Widget Repositioning on Product Pages
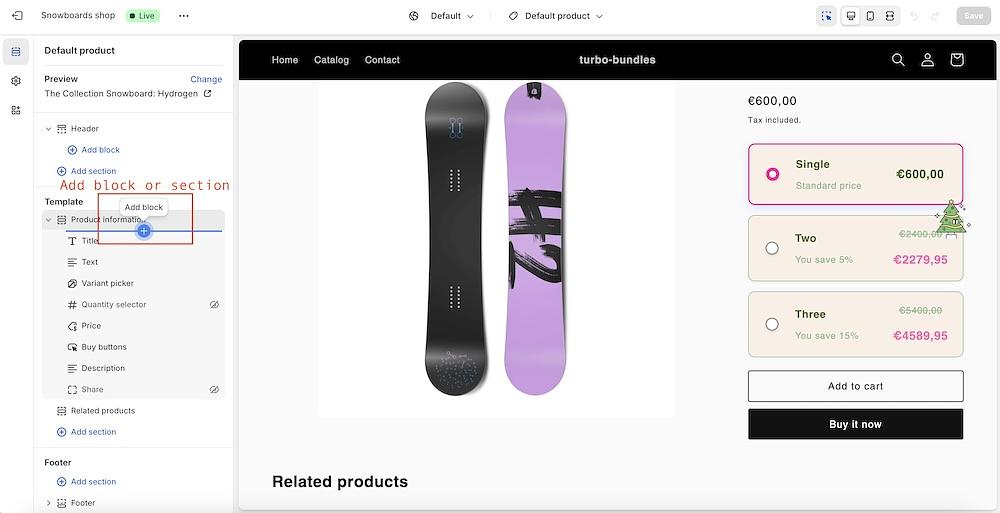
Turbo Bundles app automatically places its widget in the first "add to cart" form on your product page. To customize its placement (e.g., below the "Add to Cart" button):
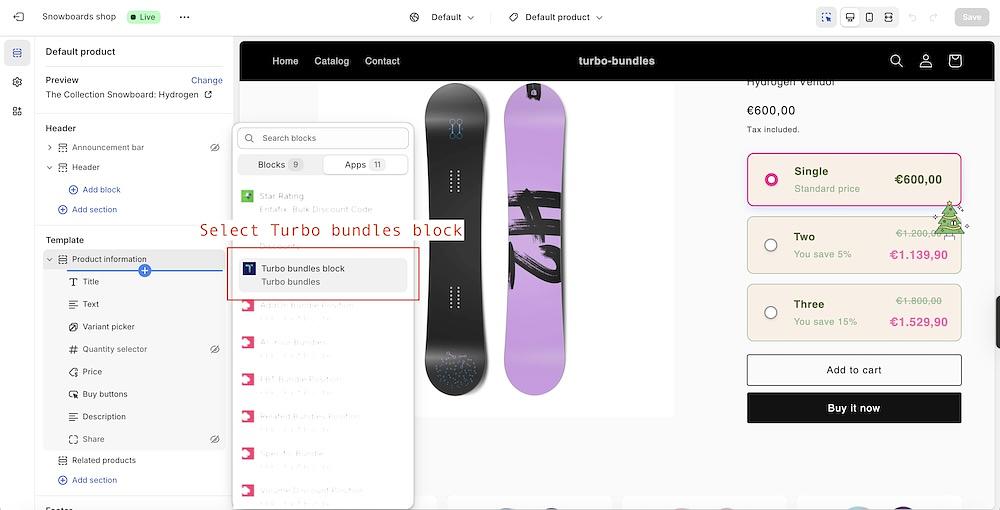
Add section or block with the turbo-bundles block to the product information/details section: